I’d been meaning to write this up for a couple of weeks but a number of things have conspired to keep me from it. I finally assembled the portion of the armoire that I’ve been working on lo these many months. If curious, there’s a picture of it after the jump. Go ahead, I can wait…
Glad to see you made it.
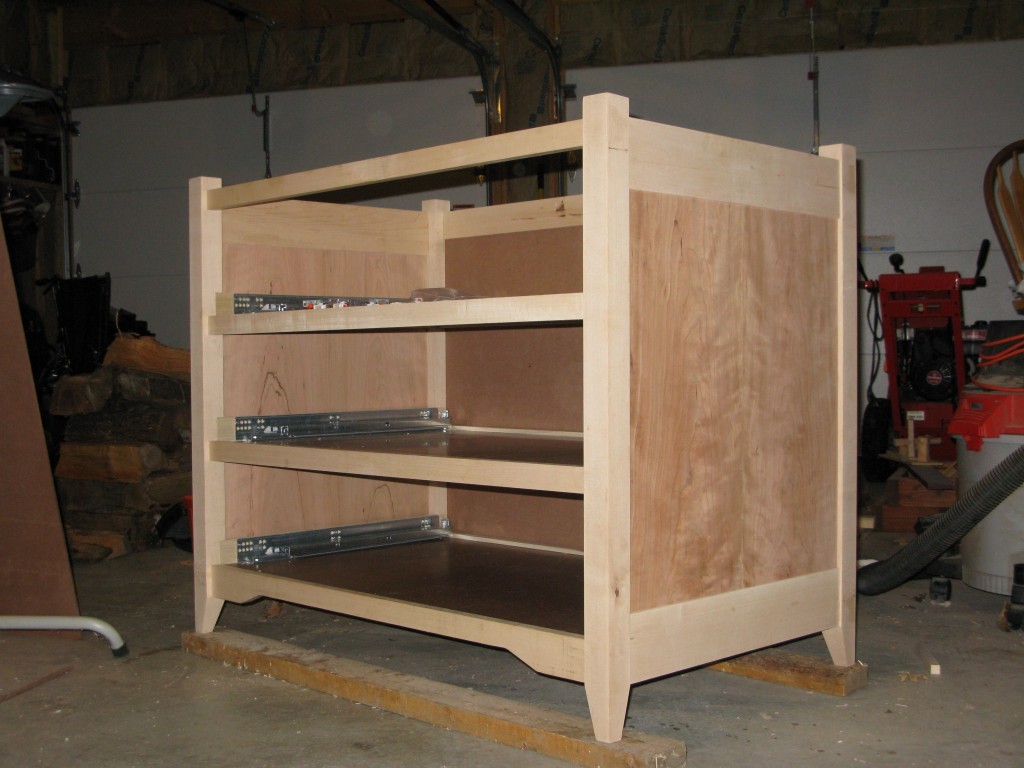
The assembly of this thing did NOT go as smoothly as I’d planned. Part of the reason for that was that I didn’t follow the plan I had originally conceived to do the assembly. To get an idea, I had to coordinate the 4 front stretchers, the 2 rear stretchers, 3 stretchers to hold the drawer separator panels, the 3 drawer separator panels and finally the rear panel. That’s 18 mortise and tenons that required gluing and aligning as well as aligning the panels in their respective dado slots.
My plan for coordinating the assembly was to insert all the stretchers into a side, then put all the panels in place, and lastly to put the second side in place. Unfortunately, when the glue started flowing, I ended up putting the front stretchers in between the two sides. Something I had to undo when it came time to start putting the panels in. Without descending into further boring detail, let’s say that I had a heckuva time assembling the whole thing and it was made more difficult because of my inadvertent abandonment of the original plan.
Even so, it didn’t turn out all bad. I checked it for any racking and the whole thing worked out well. The rear was square to within an sixteenth, and the drawer openings were all perfectly square. It was out about a quarter inch as viewed from the top, but I was able to pull that in using a clamp. Not too bad at all.
This weekend I installed the drawer slides. I opted to sacrifice a little bit of the front-back depth of the drawer in exchange for gaining a little vertical depth. The slides are set back from the front of the cabinet as I’d planned. I was able to install all of them so that all 6 slides are the same distance from the stretcher above them.
I’ve started working on the drawers now. They’ll be dovetailed front and back with half-blinds in the front. The outer dimensions of the drawer worked out to 39 7/8″ x 23 3/8″ x 7 5/8″. The drawer front is actually a little wider, 8″, than the rear and sides, so I’ll have to take care to properly register the sides and the front so that the front is properly spaced in the opening. The two sides and rear of the drawer are made using 5/8″ stock, while the front is 7/8″ finished. The tails are equi-spaced across the side, with 2 half-tails on the ends and 7 full tails in between. The bottom measurement of the tail is 3/16″ and the angle is 1:8. The drawer bottoms will be made from splined pieces of aromatic cedar.
Not much else to report. Progress has been slow. It will likely continue to be as the handcut dovetails take time. I’ve selected all of the wood for the rest of the armoire- including some more nice pieces of wide cherry with some nice looking cathedral grain pattern for the doors. I won’t be doing much with them until the drawers are done though.
One reply on “Armoire Assembly”
Awesome … before long it will be filled to overflow with ‘stuff’ and you’ll need to start another ‘storage’ unit !