It’s interesting to me coming back to my parents place and helping out with my Dad’s improvement projects. Growing up, I helped him out with many projects from tiling floors to acoustical ceilings, from decks to planting trees he pretty much ran the gamut.
Through them all, my role was clear- I was the helper. Of course, back then that made sense because what did I know about hanging drywall or fixing a sink? Dad knew all that stuff. That or he did a great job of making everyone think he knew what he was doing.
So given that background, it’s interesting to help out now because Dad clearly views me as more of an equal in the realm of carpentry. Getting my opinion asked about what I think is the best way to proceed is a big change from the way it was.
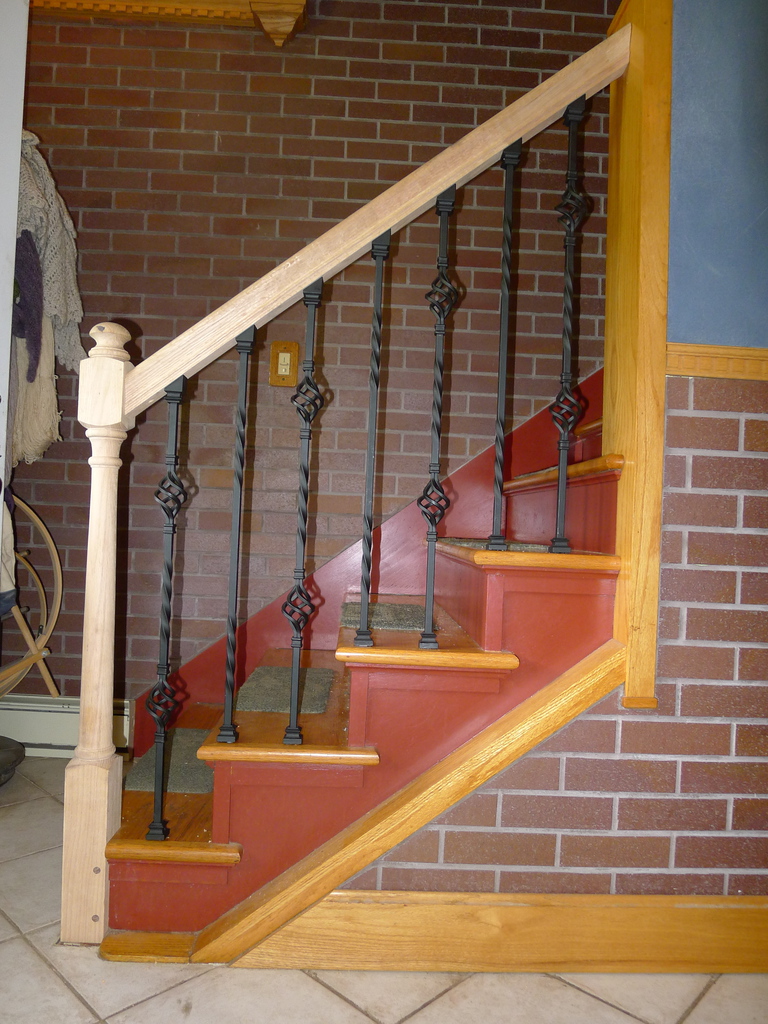
Not that he listens to everything I say. He’s still got tons more experience with this stuff than I do, so even if I might have my way of doing it, it’s still his project and his way will still prevail if he’s so inclined. Justifiably so as well sometimes. Like with the epoxy we used today to help secure the balusters in the stairs- I didn’t think it would flow as easily as it did. That made it easier to fill the holes the balusters sit in than I thought it would be.
As for putting the handrail, newel post and balusters in, the process is basically as follows:
-
Cut to height and install the newel post securely. There are hardware kits for that purpose, but in our case we just lagged it in from two sides. One into the stringer and the other into the steps.
-
Cut the handrail to length. This step is complicated by the fact that the handrail has to be cut at the proper angles on each side so it fits flush against the newel post and the wall. We actually did this in 3 steps: first, cut it to a manageable length; second, lay it along the stairs and mark the angle against the wall; finally, set it against the wall and mark the cut against the newel post.
-
Temporarily install the handrail- we just marked and drove in 3 inch wood screws into the newel post then tacked it in place against the wall.
-
Mark the center of the baluster locations on the steps.
-
Using a level, project the baluster centers up to the handrail.
-
Measure the distance from the steps to the handrail. Then, add an inch or so for the portion of the baluster that will sit up in the handrail and another inch for the portion that will sit down into the tread.
-
Now cut all of the balusters to length. Make sure to mark them all so it’s clear where they will go in the final assembly.
-
Tape off the treads where the holes will be drilled for the balusters and tape off the bottom portion of the hand rail. The tape will make the cleanup from the epoxy and construction adhesive a lot easier. Also, tape off the portion of balusters that’s just below where they will insert into the handrail.
-
Mark the angle the balusters enter the handrail or use a bevel gauge to coy the angle. Then, remove the handrail and drill the holes for the balusters. Make the holes a little deeper than necessary and about 1/4″ bigger in diameter than the balusters are. For instance, if the balusters are 1/2″ then drill 3/4″ holes.
-
Now, where the balusters will enter the treads, mark the profile of the foot. Then, inside that profile, drill two smaller holes and a slight angle towards the center. These holes will be used to pour epoxy into, so something in the 1/4″ range should suffice. Just make sure they are well withing the boundary of the baluster foot.
-
Now, drill the main hole the balusters will go into. Again, add 1/4″ to the baluster diameter for the hole size.
-
Insert the balusters into the holes in the treads. Make sure all the feet and caps are placed on the balusters.
-
Fill the baluster holes in the handrail with contractor’s adhesive, then install the handrail, including permanently attaching it to the wall. As this step is done, insert the balusters into the holes in the handrail.
-
Lift the balusters up as high as they can into the handrail hole. Use a spring clamp attached at the bottom of the baluster on the stair tread to hold it in place. Mix some of the epoxy up and then pour it into the tread hole using the two smaller holes as an aid to fill it. Allow the epoxy to set before removing the spring clamp. Repeat this for each of the balusters.
-
Remove the tape from the treads and the handrails, then set all of the feet and the caps (if used) using the set screws.
There are a ton of details that I haven’t gone into hear. In particular, the angles for cutting the handrail can be tricky to figure out. A not complete list of tools and materials needed for the job is a drill, spade bits and various sizes of drill bits, a screwdriver, a miter saw, a chop saw or a hacksaw, epoxy, construction adhesive, a putty knife, some paper cups, some masking tape, a level, a square, and a tape measure. I’m almost certainly missing something as well.
It took us an afternoon and a day to get the job done. Mostly, because of multiple trips to the hardware store for various items we realized we didn’t have like lags, screws and other miscellaneous tools. That’s what happens when you don’t truly know exactly what you’re doing. But we got it done, and it’s even pretty sturdy. All that’s left are the finishing touches like plugging holes and sanding and finishing the wood.
One more father-son project completed.