Categories
Cub Scouts Woodworking

Pinewood Derby Cars

I’m tempted to say “normally”, but I think that conveys a longer time period than 2 years. Or, at least, it implies that I’ve participated in more than 2 Pinewood Derby’s, or is it “derbies?” To tell, you the truth in all the excitement I just forgot… Maybe it’s because I’ve been building 2 Derby cars each of the past 3 years and that makes it just seem longer. Then again, maybe I’m just strung out from sniffing pine all day. You can huff pine, right? Parents these days…

So today, I did not watch any playoff football. Rather, well, I’m sure you’ve figured it out by now.

HEY!! How ’bout a picture?

{height=461}

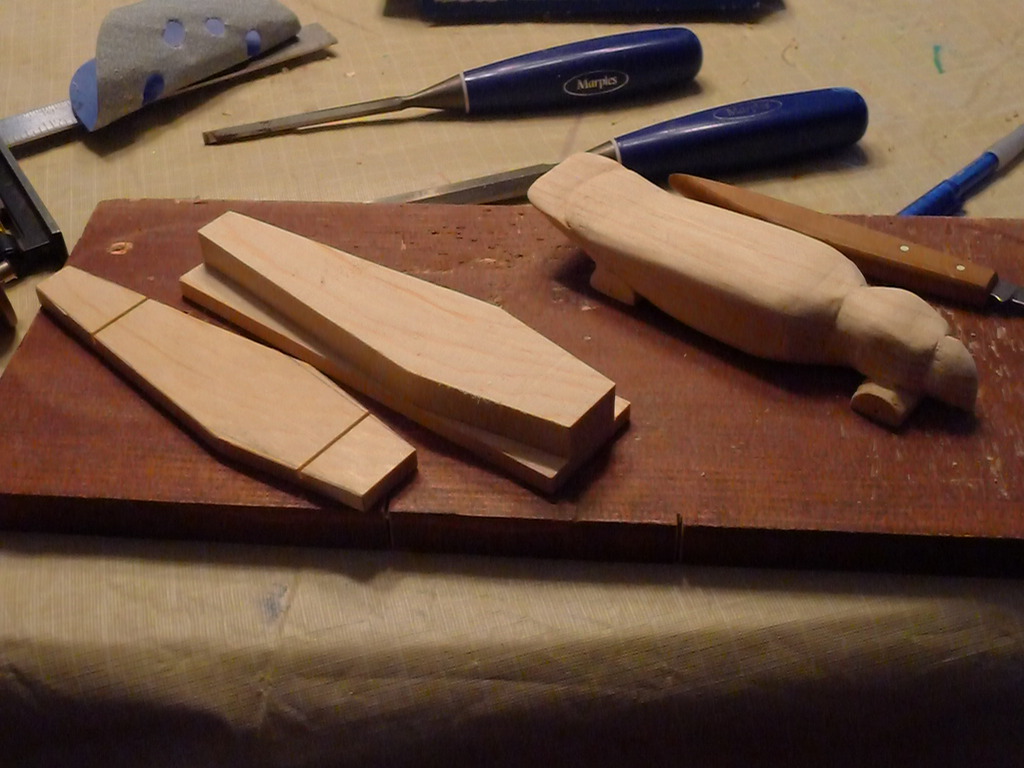
If that looks like a coffin care and a bird car, pat yourself on the back. If it doesn’t, then what the hell is wrong with you? Of course it’s a coffin car and a bird car. Seriously, what else could they be? Wait, no. Don’t answer that. They just need a paint job and wheels is all. Hey, coffins are hard to carry. And birds get tired flying around. It can happen. Especially after huffing pine all day.

Here’s another angle…

{height=614}

I should have taken a few pictures of the bird car during construction. More specifically, it’s supposedly going to become an African Grey Parrot car, but first it needs a lot of paint. Luckily, we have the lass.

The basic shape I cut out on the band saw, including a fair amount around the head and shoulder area. But the beak and neck shaping I accomplished with my chisels. Thank God it’s pine, because it smells sooooooo good. I could just sniff it all day. And it’s soft, but not like a baby’s bottom. After the rough shaping, the sandpaper smoothed everything out and improved the look. It took me most of Friday afternoon to get that much done.

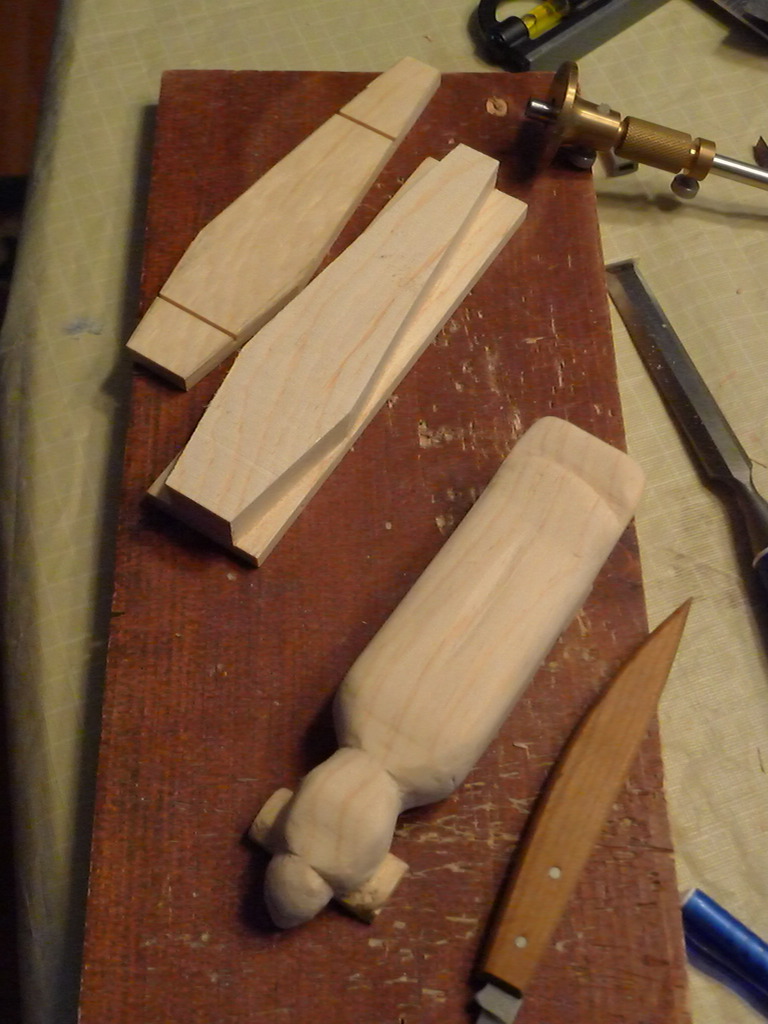
Today, I spent working on the boy’s coffin car. He saw a picture on the web of a skeleton coming out of a coffin for a derby car design and decided that’s what he wanted. Because I’m a fool, I didn’t talk him out of it.

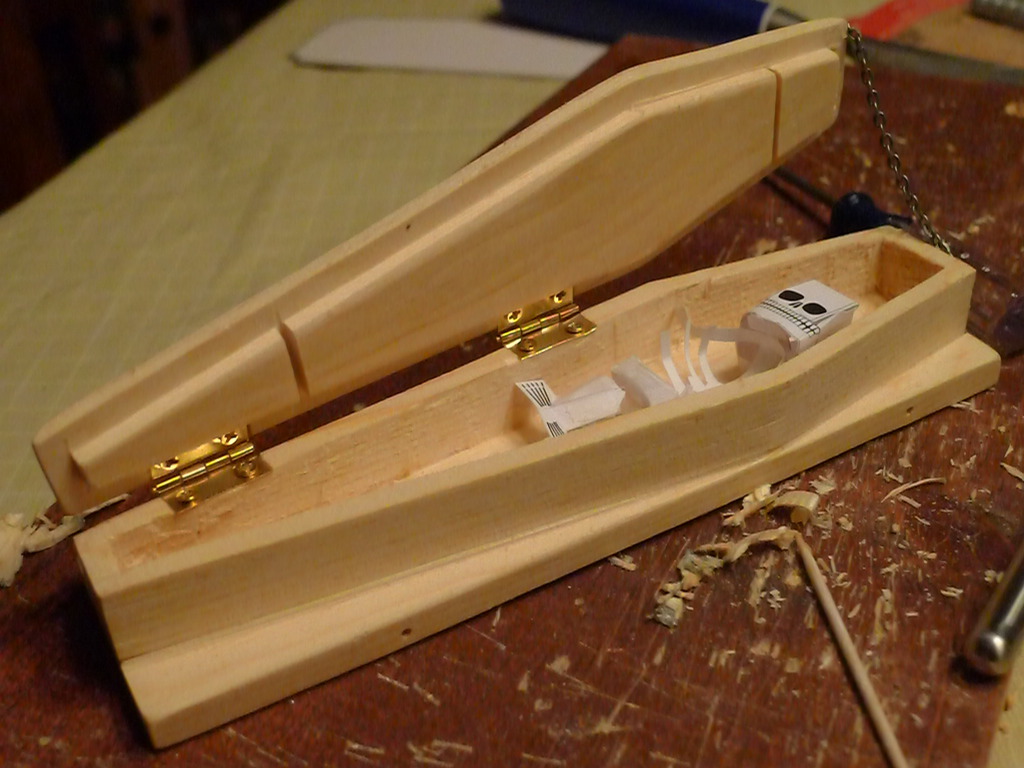
So to the point pictured so far, most of that is cut by hand. The coffin shape I managed with my dovetail saw, making the down cut first and then coming in from the side second. I clamped it in my bench vise for all these cuts. After that, I used the bandsaw to slice the top, which would eventually become the lid for the coffin. Those slots on the to-be-lid are the original axle slots that the blank has. I drill holes on the opposite side for the axles, so the original bottom becomes the top. In a normal car, those slots would get cut off and discarded.

This is not a normal car.

{height=614}

So at this point I’ve hollowed out the coffin and also rabbeted the lid for a nice, custom fit. I actually accomplished the hollowing with a 1/2 inch upcutting spiral bit for my router that I mounted in my drill press. I hogged out the majority of the wood with that, then cleaned up the edges with a chisel. As for the lid, I scribed the rabbet depth with my marking gauge then used a 5/16 inch rabbeting plane. I just cut the rabbet down until those slots juuust disappeared when viewed from the edge.

{height=614}

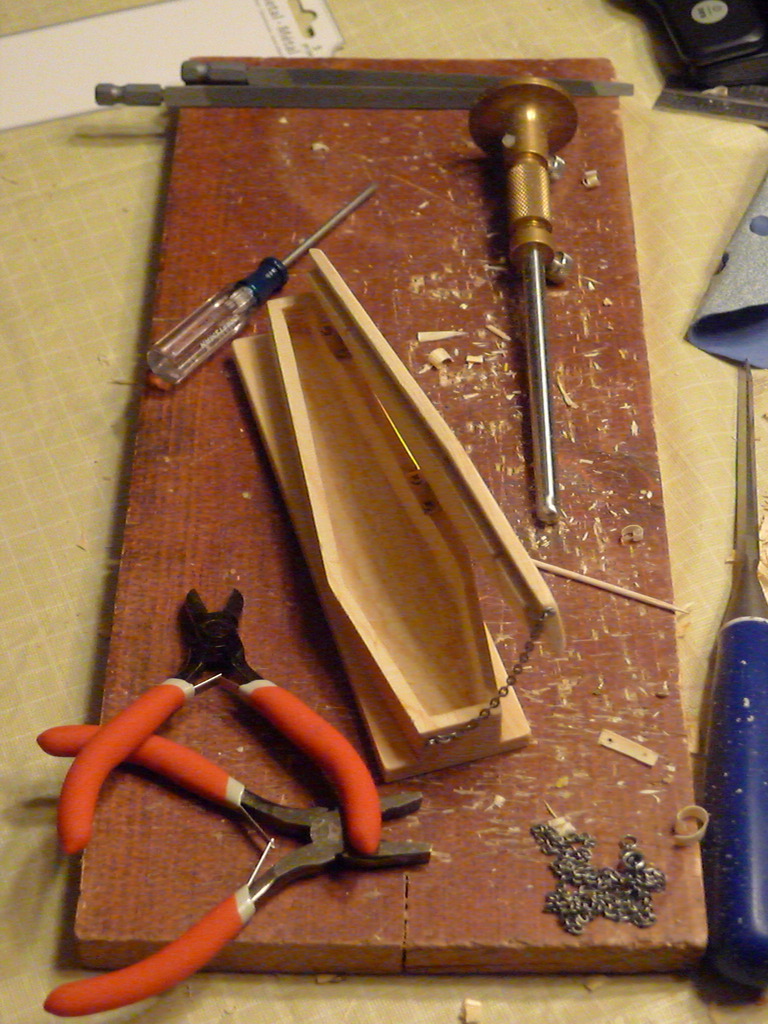
At this point, I added some hinges to the lid and then a chain on the at what would be the top I suppose though in the picture it’s the bottom. It’s all so confusing. Where’s some pine?

The hinges I found at Michael’s for a buck, the chain is a piece of a chain necklace I also found at Michael’s. I used a nail from a picture hanger since it was small enough to fit through the links of the chain. It gives it a nice look. I’ve also got some other decorations for the outside that will have to wait for the paint job.

{height=461}

I think that’s Mini-Me. Or maybe a distant cousin…

Best moment of the day?

The boy is working on the axle nails, filing down the ribs near the head so the wheels won’t have something to bind up on- it’s one of those speed tricks you pick up on competing in Derby’s. Anyway, the nail is mounted in the chuck of my drill press, spinning away at roughly 600RPM and the boy is using a piece of that silicate wet sand paper with, like 1500 grit. He’s working on his 3rd or so nail and he says to me “Making a Derby car sure is a lot of work, huh Dad?”

I didn’t answer ’cause I was too busy sniffing pine.

Categories
Armoire Notweet Woodworking

The Armoire- A Mistake

I thought I was done with the armoire, but as it turned out I made a mistake in my design. The mistake turns out to be obvious enough in hind sight, and it was easily remedied. This is more a matter of jotting it down so I remember for the next time this situation arrives.

The problem had everything to do with the drawers. They are large, solid wood doors made of maple, cherry and cedar on the bottoms. The shear size of them (nearly 3 1/2 feet wide and 2 feet deep) necessitated larger dimensions on all of the pieces, including the bottom which I made 3/8″ thick. The larger pieces means more weight, even before they get loaded up with whatever.

The drawers are mounted on Blum invisible drawer slides. These slides mount to the sides of the cabinet, but then hook under the drawer so when the drawer is pulled out the slides themselves are not seen.

To support the runners attached to the cabinet, I fashioned rails for attaching the slides. Those rails were mortised into the posts at the front and rear of the lower cabinet space. And that’s where the problem occurred. The glue holding those rails in place in their mortises let go under the combination of the weight of the drawers and the active, day-to-day usage of them. Because they let go, the drawers sagged and would hit the rails on the front that defined the drawer openings. The problem got so bad that one of the clips that attaches to the drawer itself, and then to the drawer slide, was knocked off of the drawer and made using the drawer basically impossible.

So, the fix was simple. First, I used a single screw in each end of the rails to reattach them to the post. Now, there’s not way for the rail to fail short of it actually breaking. Next, to make sure there is enough clearance, I reattached the drawers slide a little higher. The combination of fixes took care of the problem and the drawers work like new again.

The mistake I made was in not using the proper mechanical joint for attaching the rails. I should have used a sliding dovetail design instead of a straight up mortise. My assumption was I just need joint strength in the vertical direction. As it turned out, there was also a moment that I had to account for due to the drawer activity. A sliding dovetail would have handled the problem splendidly, pinning the rail into the post with no chance of it breaking out. Something for me to keep in mind for the next project I work on.

Categories
Armoire Woodworking

The Armoire Ends

Here’s my first, ever, entry on the armoire, appropriately titled to boot. The most interesting thing is the date: September 27th, 2009. That means it took me 3 year to finish this project.

On the one hand, I’m glad because where projects are concerned, a former colleague of mine had a simple theory: The longer a project takes to complete, the more unlikely it is to be completed. He may have been speaking about engineering projects at a company, but I think he also meant it in a general sense. I’m glad this ended up being an exception.

So why did it take so long?

Looking back, I seem to have finished the dresser portion of the project by April 2010, including finish and hardware. So, roughly, 7 months of on and off work which entailed the carcass complete with mortise and tenon joinery and floating panel construction, 3 large dovetail drawers and the top with trim.

The next post is in June of 2011! Then, not again until August of 2011. That was just prior to my elbow injury and I then have a post for March of this year when I finally got back to it. (Amusingly, I see I was thinking of my colleague’s theory even then!) From there, I worked slowly and steadily until yesterday.

Leaving out the 6 months lost due to my injury and recovery, the biggest mistake was in underestimating what it would take to complete construction of the cabinet. I remember thinking it was simply a matter of building up the sides and doors, with a couple of shelves thrown in and some kind of molding to trim out the top. There were, in fact, a lot of details that I completely glossed over. My miscalculation was apparent in my own plans as well. I’d drawn up plans for the dresser portion in great detail, thinking out all of the little gotcha’s and pitfalls. For the cabinet, I barely drew up any plans at all.

So therein, I’d say, lies learning point 1 for a project- design the whole thing, even if it can be neatly divided into 2 separate stages. Also, I think it was a mistake to divide it into 2 stages. Had I possessed a completed design, I could have been finishing 8 legs, and 4 sides at one time and avoided unnecessary retooling for the same basic mortise and tenon construction and floating panel construction. Of course, room would have become an issue in the garage, but my time management would have been more efficient. But all that hinges on my having a completed design from which to work.

Another mistake, which ties into the previous one, is to not underestimate the scope of the project. I had a good idea with the dresser portion, reflected in my detailed planning and steady progress. But thinking of the cabinet as “just a box” put me in the mindset that it would be trivial to whip up, and as I realized such was not the case, I became discouraged and kept putting off design decisions.

A few other things I liked, and didn’t, about the finished result:

  1. The finish is Waterlox which I rubbed, rather than brushed on. I thought it came out just shy of spectacular. In between coats, I took the time to sand (600 grit wet/dry) and wipe down everything. It made a huge difference in the finished product. I also took the time to make sure all surfaces were properly prepped prior to finishing, because the finish stage is just that, a finish. It’s not a chance to hide mistakes or blemishes.

  2. In general, I was happy with the joinery results. The dovetailing I already documented thoroughly, but the mortise and tenon joinery was everywhere: the doors, the cabinets- sides (4) and back (2). That joinery is key to the whole thing because if it isn’t executed well, then the whole thing starts to fall apart. I can say that after nearly 3 years, the dresser is still solid as ever and when I placed the cabinet on top, there were no problems with rocking or wobbliness. Also, I was alway checking for square by measuring diagonals; my biggest out of square measurement was by 1/8″ over a 4 foot span.

  3. The eyebrow on the doors was a nice touch, so too the large cove molding. The design is almost all straight lines. The couple of curves gave it just enough variation to make it visually interesting.

  4. I though the use of the cherry was well executed. In general, I used lots of cathedral grain for all the panels. The only one I strayed from that was the rear panel on the cabinet- which won’t be seen much anyway. For the doors, the rails and stiles are straight grained pieces, suited to there construction needs. Along these lines, the quiet maple serves nobly as the weight-bearing wood, nicely contrasted with the flamboyant cherry.

  5. I don’t like how the top of the cabinet came out, entirely. Mostly, this is due to construction decisions that made it difficult to figure out how to mount the top. Also, the cove molding could have been made a little different to make it easier to mount up there. This one goes back to the “design the whole thing” mistake.

  6. The Blum drawer slides and the SOSS hidden hinges were kludges to make up for the fact that I hadn’t properly accounted for all my design decisions. I’ve talked about the Blum slides (bottom line: if using Blum slides, design with the selected slides from the start and follow their guidelines) in previous posts, but the hinges were a problem because the doors are inset and recessed. Having the recessed doors and using those hinges also means the door don’t swing 180 degrees, only the 90 or so from the close position.

  7. Going back to the cabinet top, I ended up using screws to anchor it into place. I don’t like that one bit, but it was a necessity at that point.

And with that, so ends the armoire project.

Categories
Armoire Woodworking

The Finished Armoire Project

Here it is, finished and assembled in it resting place.

I actually have quite a few thoughts I wanted to put down, but not now. Too tired. I’ll revisit it again tomorrow after enjoying the fact that I completed the project at long last.

Categories
Armoire Woodworking

TA-DA!

I still have to put the final coats of finish on it. And get it upstairs. And put the handles on the doors. And shim the doors so they hang properly. And attach the top securely to the cabinet (right now it’s just resting there). And mount the cabinet to the dresser that’s been waiting for it for over 2 years now.

But other than that, yeah. It’s done.

Categories
Armoire Woodworking

Finishing the Armoire

I’m finally finishing the armoire. Literally.

When last I’d reported, I’d finished making some cove molding to be used to trim out the top of the cabinet. Since then, I’ve also fashioned some extra pieces of trim as well as glued up the wood to make the top.

So today, I finally started applying finish to the cabinet. So far, I’ve only done the panels and the doors. I’m holding off on the maple posts and other pieces until I finish fitting everything together. It’s been a bit tricky securing the cove molding to the top as well as the cabinet. All those angles make things a bit difficult.

I also ran into trouble with the top. The boards I used to glue it up weren’t perfect, so the finished surface was less than perfect as well. Keeping mind that it’s about 4 feet long and 2 feet wide, it has a small twist in it so the molding doesn’t sit flush on it. I could have forced the trim to conform to the top, but I opted for a different approach. I’m trying to use the varnish to reduce the cupping in the board before attaching the cove molding to it. I’ll be curious to see if it works.

I’ll post pics when I’ve finished assembling the top.

Categories
Armoire Woodworking

Cove Molding The Hard Way

To finish the armoire, I need cove molding. Unfortunately, I can’t just run down to the local Lowe’s or Home Depot because they don’t carry cove molding in cherry. But that’s what I need. So I had to fabricate some molding myself today.

The molding I made is made use 3/4″ stock. I ripped the boards to a 4 inch width, then set about hogging out the material using my table saw. I’ve seen it done where the wood can be push at an angle across the blade, thus hogging out the desired arc in one fell swoop. I didn’t use that technique. Instead, I kept adjusting the depth and position of each cut until I’d removed all the material I could. The result is a series of steps that rough out the arc. For each cut, I’d set the blade and fence, then pass the wood over it, turn the board end-for-end and do it again, so the arc ended up symmetrical.

My initial cuts were in the 2 deepest cuts in the center. I then switched to working from outside to in. Initially, I tried eyeballing each cut, but that didn’t work so I traced an arc from the middle to one edge so I had a line to work to for each cut.

When that was all done, I tried to sand the results to smooth it out. After going through 3 pieces of sandpaper on my first piece of wood, I decided to give my curved card scraper a try. That worked out much better and I finished the job that way. After the jump are pictures of the stock at varying points in the process.

Categories
Armoire Woodworking

Armoire Progress and Pictures

So, here we go. Seems like as good a place to start as any. The doors are actually mounted on their hinges here. More on that in a bit. Not much else to comment on the doors, the panels are book matched and the eyebrow is pretty clear here. I wasn’t able to get a single piece of wood wide enough to serve as the panel, so I had to do a glue up.

Categories
Armoire Woodworking

Recent Armoire Progress

I’ve just completed assembly of the doors for the armoire, which means I’m getting real close to finishing it. My main task now is to create the molding and the top, apply the finish, mount the doors, and I’m done. Real light-at-the-end-of-the-tunnel territory here.

The doors went together almost better than I’d hoped. In fact, in addition to the dovetailing, door assembly is another area where I’ve improved tremendously on this project. Actually, mortise and tenon joinery in general is what I’ve improved on. I’ve learned how to effectively wield a shoulder plane to trim the tenons to nicely fit a mortise. Now more racked doors or floating-panel assemblies. It’s kind of nice to have achieved a level proficiency and skill with this stuff. All it takes is time and lots of crooked doors.

One nice I did different with these doors was to put an “eyebrow” on the panel. When I initially decided to go this route, I thought of a couple of possibilities for how to go about making the rails and panels. In the end, I went with the simplest, I think method: cutting a large radius across the top of the panel and a matching arc from the top rail. I still had to be careful when cutting the panel to length, and width because the arc made thing a little tricky (where do I measure the length? the middle? the ends? Plus, it has to fit into a groove in the rails and stiles.)

Doing this made the assembly of the door a bit different than normal panel door assembly. Instead of gluing and assembling a stile and both rails, then sliding the panel home and finally adding the second stile, the assembly started with a stile and the top rail with the eyebrow cut in it. After those pieces were mated, the panel was inserted followed by adding the bottom rail to the assembly. Then, I completed assembly by adding the other stile. I had to do this because with the arc from the eyebrow, there was no way I could assemble both rails and then slide the panel into place.

I’ll try to get some picture of up in the next day or so to show off the work that’s been accomplished. But in all, I’m pleased with the product and I’m looking forward to seeing the finished piece come together.

Categories
Armoire Woodworking

Some Gluing!

Amazingly, I finally got a chance to do some gluing today. I’m happy to report it went pretty well, although the rear panel gave me some fits. Mainly, it was a clumsy operation for 1 guy to work through because of the size of the parts involved. But, once I got everything started, the clamps did the rest of the work pulling everything together.

Now that what I have is together, I’m wondering how the hell I’m going to get it up to the second floor. It must be close on 100 pounds, plus it’s 4 feet wide, 2 feet deep and 3-and-a-half feet tall. Plus, I still have to add 2 doors and a top with some molding. I may need to rent a crane.

Another modest logistical problem is that I couldn’t glue it up on my workbench because of the size, so I did it on the floor in the garage. Technically, on a mat on the floor in the garage. Unfortunately, that spot is right in front of my workbench, so I’m going to have to find a different location for it before I can do any more work on it. How I’ll move it without dinging it should be a fun little exercise.

I’ll try to post some pics later this week after I move it.

Categories
Woodworking

Varnish Can Warp Wood

I’ve been finishing some shelf surfaces with Waterlox varnish. I’ve used it before with good results, but only on pieces I’ve finished assembling. In this instance, the shelves have yet to be installed into the final piece.

I only finished one side of each shelf, and after I put a 2nd coat on, I noticed one of the long edges of the wood was off the table. So I then eyeballed the shelf from the side and could see a clear warp in the shelf. The shelf is about 2 feet wide and 3 feet long, so it’s easy to spot a warp.

It initially perplexed me, because I typically associate warping with one side of the wood drying out faster than the other. In this case, that didn’t seem possible since, theoretically, the varnish should have stopped the exposed side from drying. If anything, I’d have expected it to warp in the other direction.

But then I recalled something Dad told me about some varnishes- that they actually shrink when they cure. Since the same thing happened on both shelves, this seemed like a more plausible explanation, despite the fact that I’d never seen this affect before. So I flipped the shelves over and applied the finish to the other side, hoping to straighten the shelf out.

The warp in the shelf, by the way, was a potentially major problem for me because the shelves aren’t installed yet. The way I’ll be installing them involves a spline running along the side that fits into a support. The support is dead straight. Matching a warped shelf to a straight support makes for a miserable experience.

Fortunately, I guessed right and applying the finish to the other side of the shelf has straightened the shelf out. So I won’t have to worry about fighting with the shelves during assembly. But I also learned something else to keep an eye on when it comes to wood finishing.

Categories
Armoire Woodworking

Meanwhile- Back in the Woodshop

I remember and engineering colleague of mine had a simple observation about projects: The longer it takes to complete, the more unlikely it will be completed.

I fighting like hell against that observation right now where this armoire project is concerned.

No big posts with pictures about what I managed this weekend. Rather, taking pictures and documented the actual work and design decisions will serve as incentive for me to actually get something meaningful done on the project.

But as a quick recap, when last I’d touched the wood out there I’d managed to complete and glue-up the sides of the cabinet, as well as gluing up the rear-panel, cutting the front and rear stretchers and gluing up the shelves for inside the cabinet. Then I injured my arm and that was that.

Until this weekend, where I managed to cut and install the shelf supports as well as finish sanding the shelves themselves. I also cut the shelves to their final size for when I actually assemble the cabinet. If I’d pushed things, I could have done some glue-up tonight, but I chose not to because I didn’t want to make a mistake I’d regret at this point. Perhaps this week I’ll get the cabinet assembled and glued up, complete with the shelving.

That leaves the doors as well as some molding (or cornice) as well as a top and the project is complete. Except for the finishing.

Categories
Family Woodworking

More Patience Please

One gift the boy received was a woodworking kit. It consists of a motor which can be oriented 3 ways, along with necessary supports parts, to operate as a jigsaw, a drillpress or a lathe. Woodcutting capacity is small, as would be expected. The wood that comes with it is pine and it’s all very thin stock. The lathe can handle pieces probably as much as 6 inches or so, though that’s pushing it. Oh, almost forgot, it has a disc sander as well. So make that 4 tools.

Regardless, it’s more than enough to make some simple woodworking projects like small tops, model airplanes, jigsaw puzzles and those wood projects that are slatted together to make dinosaurs or cars or planes. Simple stuff that probably takes an afternoon of effort. (He was wondering if it’s the sort of equipment that “professionals” use- an amusing question considering the table saw and so forth in the garage.)

The boy had some initial enthusiasm for it, but it seems to be waning quickly. We turned a simple top together yesterday, took about 15 minutes to do so, and he liked that. But then we tried to make a slatted plane project and he lost interest in it after an hour or so. We’ve got most of the pieces cut out, but there are some holes to drill before we can start fitting it together. He wanted to finish it tomorrow. Guess we’ll see.

Hard to generalize things like this, as every kid is different when it comes to the whole deferred gratification phenomenon. I’m sure that video gaming doesn’t help in this regard- nothing much more immediate than pushing a button and watching Mario jump. I don’t like to push him about things I’d like to seem him do more of because I believe in the soft sell approach. My assumption (hope?) is he’ll pattern off of me and at some point will come to enjoy the building of a project more than the completing of a project. But I’m also aware that many of the things I enjoy are time consuming and certainly beyond his current attention span.

But more and more, I wonder if that’s just something that is innate to a child. In other words, they can’t be taught to like building stuff; it’s either a part of who they are, or it isn’t and the amount of exposure to it matters not.

Just one of the many unknowns of parenting.

Categories
Family Woodworking

Woodworking with the Boy

The Wife has been desiring a printer stand that she could roll under her desk. It’s a simple project to build and I figured it would be a perfect afternoon project to do with the boy. He didn’t need much convincing and was particularly excited when I told him he could paint it.

The overall design was simple: 4 pieces of pine with the top long enough to accommodate the printer, the two middle supports tall enough to offer a little storage but still short enough so the whole things can fit under the desk with the printer on top, and a bottom.

I had the boy help me measure the length of the printer, then I drew up some simple plans. The dimensions were easy, 2 feet long and 1 foot tall. Initially, I drew up a box, but he didn’t like that. So I altered the box by sliding the 2 sides closer together so that the box had “wings.” He liked that one much better. With the design all set, we added up the lengths of wood and then set off to grab some wood to make it.

I guided him towards the pine because I knew that would be the easiest to work with. I sold it to him by telling him it would be the easiest to paint. Then I pointed out some things about the wood to look out for, like rough spots where the planer didn’t cut the board cleanly, and helped him settle on a nice piece of wood.

When we got it back to the shop, he helped measure the length to cut. He even worked up the courage to use my mitre saw to cut the boards to length (with a little help from Dad). After everything was cut, he just wanted to start gluing. But I told him we had a little more to do so that it would be nice and strong. He wasn’t too happy with having to wait to put it together.

I talked him through setting up the dado blade on the table saw, and then how I was setting up the mitre gauge so I could make the cuts. He couldn’t help make those cuts because he isn’t tall enough to work at a table saw. It didn’t take a lot of time and we got the glue up done shortly thereafter, where he helped tighten up the clamps.

Since it was for the Wife, he wanted to paint it purple and red- her favorite colors. A bit garish for my tastes, but it was his call, not mine. He painted the outer portion purple, and the inner boxed are red. Again, I had to help him to make sure more paint ended up on the wood than on the floor (and everywhere else), but he did a nice job.

All that’s left is putting the wheels on the bottom. Then the Wife will have her printer stand, and the boy will have finished his first woodworking project.

Categories
Armoire Woodworking

Armoire Update

Progress has been slow, but steady on the armoire. The sides glued up without incident. Completing that portion allowed me to move on to the back. And working on the back brought the realization I’d made a mistake in my wood quantity calculation.

I’d originally thought I’d use tempered masonite for the rear panels. I, in fact, did exactly that for the lower portion. But in working on the back for the upper portion, it occurred to me there’s a major difference between the back of the lower half and the back of the upper half of the armoire: the rear panel of the upper half is visible. (The lower half consists of 3 drawers, so the only way to see the rear panel is to remove the drawers or get behind the whole thing, niether of which is easy.) Tempered masonite is fine to use as a panel, but not when it will be visible in a natural wood piece of furniture.

Fortunately, when I’d purchased the wood, I got more than I would need on the grounds that I’d just use it for another project down the line. Guess that project down the line has arrived.

After the jump are some pictures.

Categories
Armoire Woodworking

Both Sides Coming Together

In the end, the sides of the upper cabinet of the armoire were straight-forward to assemble.

My glue of choice is there in the background: Titebond III. It’s supposed to be stronger and more water resistant, but the main reason I chose it is because it has a longer open time. Since I was the only one doing the assembly (sadly, the boy wasn’t interested) and I had to coat all 4 mortises and tenons before putting things together, open time was going to be key. The only thing I don’t like about it is it’s runny, certainly more so than version II. I accounted for that by applying and spreading it in small doses.

One deviation from “normal” panel assembly, I suppose, was putting the panel into the rails before I’d glued the rails into the post. I chose to do that because the panels are warped enough that I didn’t think they’d slide into the groove on the rails very easily. Pre-installing them in the rails avoided that problem and turned out to be a non-issue for the overall assembly.

Categories
Woodworking

Up-cutting Spiral Bit

I got my first chance to use a up-cutting spiral bit yesterday with my router and I have mixed reviews about it.

First, the situation. I needed to cut mortises in some posts. Eight mortises in all, to be exact. The mortise dimensions were 3/4″ wide by 3 7/8″ long by 1 3/8″ deep. So long and somewhat skinny. The bit I have is 1/2″ in diameter.

The router I used is a Porter Cable 691 with the plunge router base. Because of the depth of the cut, I knew I’d need at least a couple passes to finish the cut. I was hoping that was all I’d need.

The good part is that the bit cuts very easily and cleanly, especially when compared to a straight cutting bit. The plunge into the wood was not a problem and, as long as I didn’t attempt to remove too much material in a single pass, there was no bucking or chattering as I moved the bit through the wood. The bit even manages to eject some of the wood shavings, as I’d expect from an “up-cutter.”

The bad is that it’s not nearly as effective as I’d hoped at ejecting the shavings. While it didn’t pack the mortise with the shavings I was trying to remove in the first place, enough would get stuck to force me to remove the router, remove the shavings using my dust collector, and then restart. I did eventually figure out that I could cut the mortise in a spiral pattern that allowed the bit to force most of the shavings out. However, the going was tedious with that method and it would take 15 seconds or so of moving the router back and forth to get clear the mortise before I could resume cutting more material out.

Some perspective does help here. There are 3 ways to cut out a deep mortise: using a drill press and chisels, using a router, and using a dedicated mortiser. (I’m aware of the mortising attachment for the drill press; unfortunately, the spindle on my drill press is a non-standard size so it wouldn’t be an effective solution for my situation.) Using a drill press requires using a Forstner bit to remove the majority of the material and then squaring up the mortise with chisels. I’ve used this technique many times in the past- it’s a long, labor intensive and error prone approach. Especially in hard wood like maple or oak, it’s difficult to attain the nice vertical sidewalls in the mortise.

A dedicated mortiser (like so) is certainly a nice piece of machinery and would be ideal for the kind of work I was doing here. Unfortunately, I’m not in possession of one of these and I have no plans for obtaining such a machine anytime soon. No sense dwelling on what can’t be.

That leaves the router approach, and despite it’s not living up to expectations, the spiral up-cutter is definitely an improvement over the straight cutting bits. The overall result is superior to anything I could manage with the drill press and chisels. So given my range of options, I expect it will get plenty more use.

Categories
Woodworking

Putting Humidity to Good Use

Over the weekend I resawed some 12″ cherry boards so I could bookmatch them and subsequently use them as panels in my armoire project. When I finished the resaw operation and planing the boards to remove saw marks, the finished pieces were roughly 5/16 of an inch thick.

And they cupped something fierce. Probably a half-an-inch from a side to the center of the board. One of them even developed a bit of a twist.

I wasn’t completely surprised, nor was I too concerned. My first attempt to flatten the boards was to set them out in the sun cupped side down. My thought was the Sun shining on the longer side would dry the board out and flatten it. Alas, that didn’t work very well.

When the humidity moved in today, I decided to try the opposite tact. I laid all the boards cupped side up on my workbench in an attempt to expose the shorter side to the humidity so it would expand. Wouldn’t you know it, the gambit worked. In less than a day no less. The boards are flat as a pancake now.

Chances are the technique wouldn’t work as well on thicker boards, but definitely something to keep in mind for future applications.

Categories
Armoire Woodworking

Back in the Woodshop

I finally went back to work on the armoire today. I’d cut the posts out a couple of months ago and at the time, I had the intention of starting it up. But I couldn’t summon the discipline to work through it because, while the top half will be much simpler to construct than the bottom half, there are details that need to be worked through, those details are important and with the busy schedule I just couldn’t focus on them long enough to sort them out in my mind.

Details like, the width of the stretchers, how to mate the top-half with the bottom half, the profile for the cornice for the top, whether to make the doors all cherry construction, or cherry and maple construction. None of that includes the proportions so that that the top looks right sitting on the bottom. I’ve been mulling all of that stuff in my mind for several weeks now. Finally, with the break in the kid’s schedule today, I opted to start making it into a reality.

Even so, meaningful progress was minimal.

Categories
Chairs Woodworking

Chair Repair

A couple of months ago, The Wife’s Aunt asked me if I could fix this chair. She then proceeded to show me how it was very “wobbly.” She was concerned that it would break the next time someone sat in it.

She had good reason to be concerned. The glue in most of the joints between the legs and the cross pieces had failed and in most cases the tenons were working their way apart. Somewhere along the way, someone had attempted to “fix” the problem by smearing a heavy layer of glue all over the joints. This attempt probably worked right up until someone sat in it- glue isn’t a structural medium. It’s a binding medium to use with structural elements in a project.

At any rate, after looking it over a bit I felt it was salvagable. She took the pressure off me when she said she wouldn’t be heartbroken if it wasn’t fixable. I figured I had nothing to lose since, if I broke something critical while pulling it apart, I could just tell her it didn’t work out.

But that wasn’t the goal.